Concepts
1 Introduction
Catalogues often contain so-called index tabs. These are used to help readers quickly locate chapters. The tabs can be positioned on the left, on the right or on both sides of the spread.
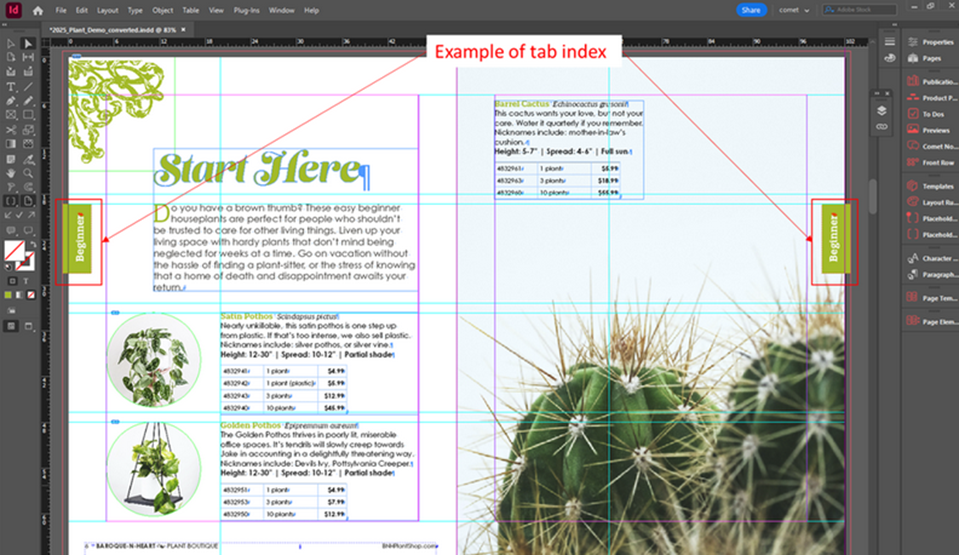
The usual approach is to create them as frames on the parent pages of a document template and optionally equip them with content placeholders. However, this standard procedure has several disadvantages:
- The tabs are not dynamically adjusted to the content structure of the catalogue. This means that if a chapter is removed, the tabs must be revised manually afterward, either on the parent pages or directly within the individual document pages
- When working with many different document templates, a large number of parent pages must be edited
- Editorial documents that were not originally built with the same document templates containing the tabs must be revised manually
Hence, this Acceleration Package standardizes the implementation of tabs for project executions and provides a higher level of automation for users when working with tabs.
This documentation gives a general overview of the implemented feature and the interaction of different configurations.
An additional documentation will guide the user during the templating process of this Acceleration Package.
2 Solution Design
The tabs no longer are created as elements on the parent pages of a document template but are placed on the pages using a script and templates. The Comet templates serve as the basis and contain comet placeholders to load the corresponding content of the tab. There are some restrictions and things to take care of during the templating of these tab templates.
Metadata objects from publications, folders and documents are used to determine how the tabs are structured and placed on the pages.
The function to create the tabs is part of a script library and can be executed within InDesign Desktop and priint:planner scripts, like in the provided [accpack_Index_Tabs] Create Index Tabs script.
The general algorithm is like follows:
- Removing old tabs: the script can be executed several times for a given document, e.g. to apply changes of the metadata. This means existing tabs have to be deleted first. All tab elements are identified by the frame tag key accpack_index_tab and all elements with this key will be collected and removed.
- Fetch all tabs of the publication: The code will call a method of the Java Plugin to fetch a list of all required tabs for the current publication. This means, the code will start at the current document and goes up in the hierarchy until it reaches the root publication. Starting at the root, it will evaluate all folders underneath (including their documents) and collect a list with unique entries of the metadata "Content". The method will return a StringList of the different Record String IDs selected in the metadata. (Please note, that the Record String ID will not provide the parent information)
- Creating the tabs: After metadata evaluation, the script will place the fitting tab template(s) on the corresponding page types and link the placeholders with the fetched Record String IDs. The metadata objects for the template selection will be dropdowns for which the consultant has to fill a value list in priint:admin. The first value will always be the Template name, the second value must be the Template ID, which will be evaluated by the script implementation in this step.
- Positioning and resizing the tab frame(s): The selected metadata values will define the positioning and can be used to resize the tabs automatically, when the Autosize feature is activated. For that reason, only templates with one frame are valid as tab templates. All position and dimension values in the metadata are specified in millimetres; the script converts them to points before placing frames. For tabs on right-sided pages, the X position is calculated as page width minus the configured X value.
- Loading the tab content, trigger layout rules: Afterwards, the placeholders are loaded which can trigger standard comet templating features, like layout rules. If the special feature for cutting dies is used, the implementation will place those elements on the page at this point, add them to the current comet group, and place them on the "Cutting Die" layer.
- Copy tabs to all pages: At the end, the inserted tab components will be duplicated and placed on all remaining pages of the document. Cutting die elements are moved to the "Cutting Die" layer on each target page during this duplication.
Layers
The script creates two named layers automatically if they do not already exist: "Index Tabs" for tab frames, and "Cutting Die" for cutting die geometries. Creating these layers in the parent document in advance gives full control over layer order and settings.
3 Metadata Overview
All metadata is saved within the Publication Type AccPackIndexTabs. They are delivered via a priint:admin XML file. After importing this file to the Priint:Suite of your project, you will get the new Publication Type and all corresponding metadata, including predefined value lists.
Make sure to assign all metadata of the Acceleration Package to the Publication Type, used in the project.
3.1 General configuration
The general configuration metadata controls three things: which content the tab references (a bucket selection), whether index tabs are displayed on the pages of a document at all, and on which page side the tabs appear (left, right, or both).
See Reference for the full list of fields.
3.2 Template selection
Template names and IDs must be added to the value list "itab_template_ids" within priint:admin. The predefined values are only examples; the templates are not part of the Acceleration Package!
See Template Selection for the full list of fields.
3.3 Area definition
The metadata objects of this section define the position and area for the tab placement. See section Area of index tabs for more information.
See Area and Sizing for the full list of fields.
4 Inactive Tabs
A catalogue may show all chapter tabs on every page, or only the tab for the current chapter. When all tabs are shown, two types of tabs appear: the active tab for the current chapter and inactive tabs for all other chapters. Separate templates can be defined for active and inactive tabs, for both left and right pages.
See Template Selection.
5 Area of Index Tabs
The tab area is defined separately for left and right pages. For left pages, the area starts at the top-left corner. For right pages, it starts at the top-right corner. The area width comes from the template width. The area height depends on whether Autosize is enabled.
See Area and Sizing.
6 Autosize of Index Tabs
When Autosize is enabled, the script calculates the height of each tab frame from the configured area height and the number of tabs. All tabs, active and inactive, get the same height. This option is typically used for digital or interactive versions of a catalogue. When Autosize is disabled, the template creator must take care of the tab height definition to fit all tabs on the page. This is the typical approach for print versions with cutting dies, where the print service provider specifies exact dimensions.
See Area and Sizing.
7 Special Feature: Cutting die definitions
Some print projects require cutting dies around the index tabs. The layout rule [accpack_Index_Tabs] Add Cutting Die creates cutting die geometries around each tab frame. The geometry can be lines or a rectangle area. The created elements are tagged with accpack_index_tab and are re-created with each script run. Always consult the print service provider of your project for the required output, style, geometry, size, and position of the cutting die.
See Cutting Die.