Installation and Configuration
Prerequisites
Package
The deployment package is available on the priint webftp storage, in the priint_suite_accpacks folder under AccPackDataImport. Please contact our support for access.
Standard Import Package
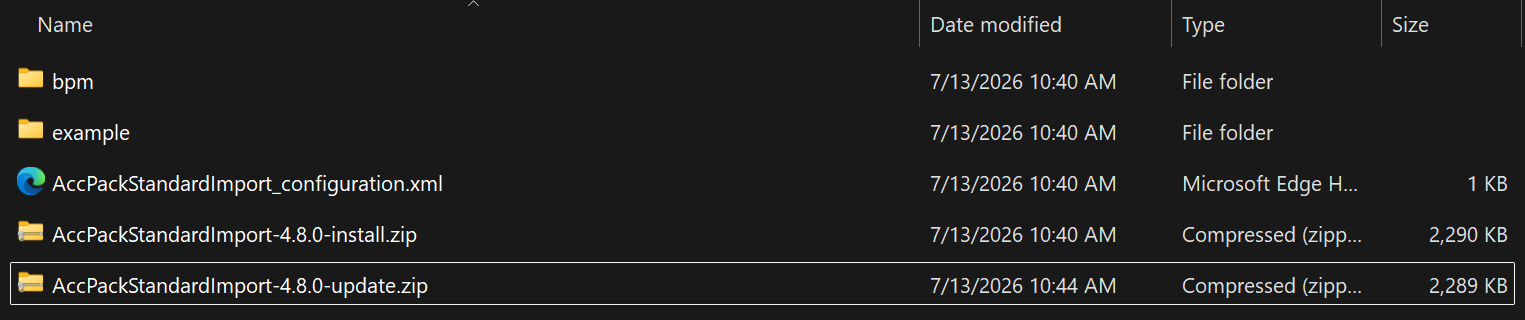
The downloaded package contains the following files and folders:
| File/folder structure | Contents |
|---|---|
AccPackStandardImport-<version>-install | Plugin war, import core API jar, ISON XML configuration |
AccPackStandardImport-<version>-update | Plugin war, import core API jar |
example | Example Excel data and ISON config |
bpm | Camunda processes needed to import data |
AccPackStandardImport_configuration | Configuration for a project or tenant that differs from the standard |
Plugin Installation
Case 1: First-time installation
Use this guide if the module has never been deployed in this project.
- Unzip the package
AccPackStandardImport-<version>-install. - You will find
AccPackStandardImport-<version>.zip. - Navigate to the priint:admin UI.
- Execute the package deployment process.
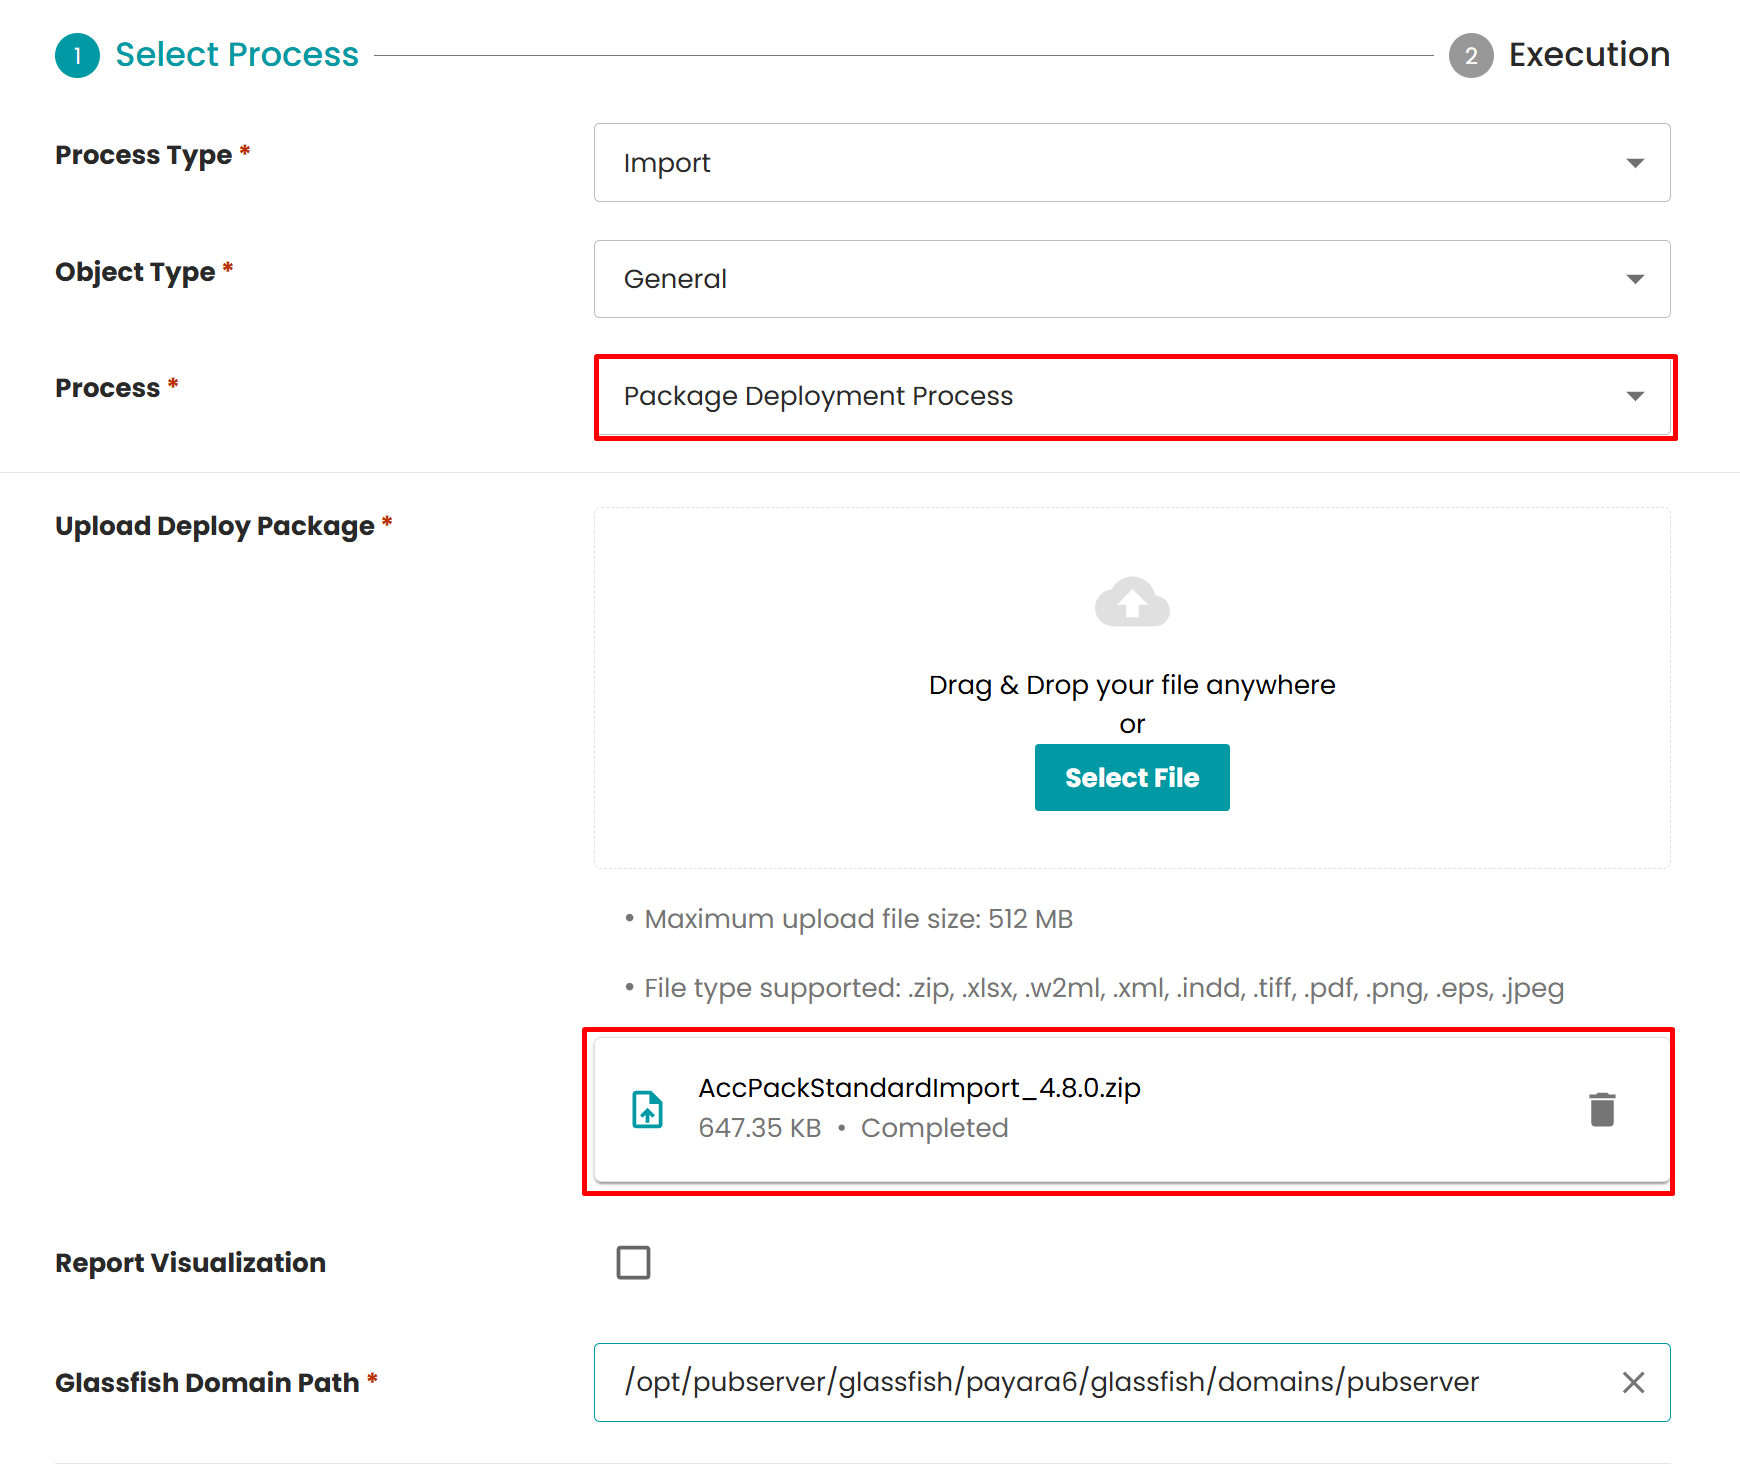
This overwrites your current StandardImport configuration settings.
Deploy AccPackStandardImport_<version>.zip together with the configuration file, as described in Using Accelerating Package in your Project.
Case 2: Upgrade (module already installed)
Use this path to update only the plugin and library without affecting the current configuration.
The plugin war and library are part of the deployment package. Deploy AccPackStandardImport_<version>.zip as described in Using Accelerating Package in your Project, then restart the Publishing Server.
Camunda Process Installation
The deployment package installs the plugin only. The included Camunda processes must be imported separately. Deploy them with the following properties. Please note that you don't need both, choose the process for the use-case you have in your project.
- Accpack import data.bpmn
- Process Type:
Upload Process - Object Type:
Publication/Folder
- Process Type:
- Accpack import timer.bpmn
- Process Type:
Upload Process - Object Type:
Publication/Folder
- Process Type:
- Upload images by system volume.bpmn
- Process Type:
Upload Process - Object Type:
General
- Process Type:
Final Steps
After a successful deployment the following should be in place:
accpack_import_api-<version>.jarin/pubserver/libAccpackStandardImport.warin/autodeployaccpackStandardImport.xmlconfiguration file can be found incom.priint.accpack.standardimport.StandardImportPlugin/<your_tenant>/default/
The processes should appear in the deployed processes of your priint:planner application.

System Setup
In the Admin of the priint:suite some additional settings should be checked before you can use the import.
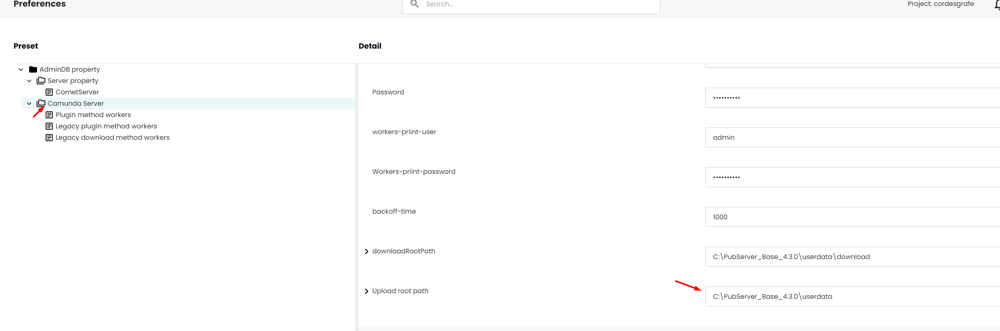
-
Upload root path: Configure the Upload root path in the Publishing Server settings.
-
Server properties (Comet Server): Set the maximum file size to
512and addxlsxto the allowed upload file types.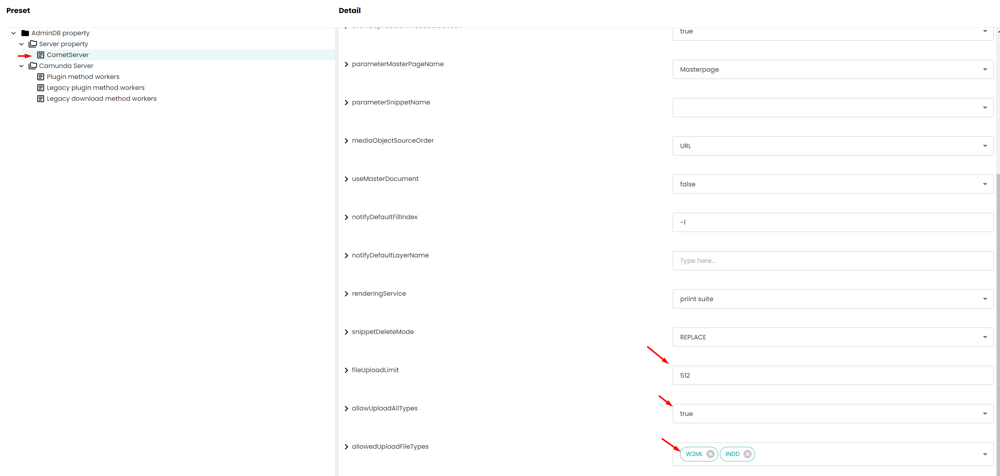
Server Volume Configuration
The import file references its images through a server volume: the MediaAsset_path column contains the volume path. The demo data set uses file-system/aio. Define a matching server volume in the Publishing Server configuration.
Volumes are defined in ServerConfig.xml, found in globals/server_config. Place custom settings in custom_ServerConfig.xml to keep them separate from the default configuration.
<cfg:servervolume>
    <cfg:name>minio01</cfg:name>
    <cfg:address>localhost:40080</cfg:address>
    <cfg:path>file-system/aio</cfg:path>
    <cfg:tag>object-storage</cfg:tag>
</cfg:servervolume>
- The
pathvalue must match theMediaAsset_pathvalues in the import file. - The
object-storagetag marks the volume as an object storage volume.
For the full server volume and object storage documentation, see Configuring Server Volumes. For how the import maps the Excel paths to volumes, see Media Asset Path and Server Volumes.
Additional Configuration (Optional)
If you want to use the default import profile with the default processes, you can stop at this point. Check out the examples to get started with the demo data.
If you want to integrate the import into an existing project, or you plan to customize the import profile, check the following additional configurations.
Camunda Process Variables
These variables are configured on the import Camunda process and must be adjusted for your project.
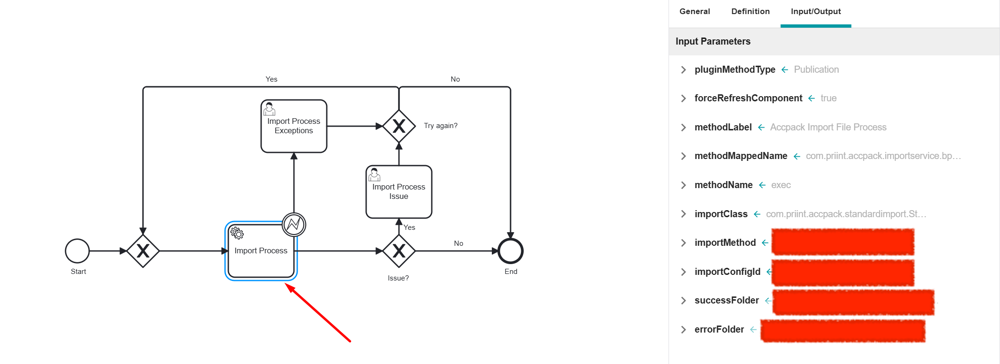
| Step | Variable | Example value | Description |
|---|---|---|---|
| Start | inputFormPlugin | com.priint.accpack.importservice.bpm.ImportFileForm | Displays the import file UI |
| Import process | importClass | com.priint.accpack.standardimport.StandardImportPlugin | Points to the Standard Import plugin |
importMethod | executeImportExternal | Import method to call | |
importConfigId (*) | Default | Maps to configId in the ISON XML configuration | |
successFolder (*) | /opt/pubserver/userdata/hotfolder/success/ | Directory for successfully imported files. On Linux, must be owned by the pubserver user. | |
errorFolder (*) | /opt/pubserver/userdata/hotfolder/error/ | Directory for failed import files. On Linux, must be owned by the pubserver user. |
Entity Configuration
PublishingHubDB
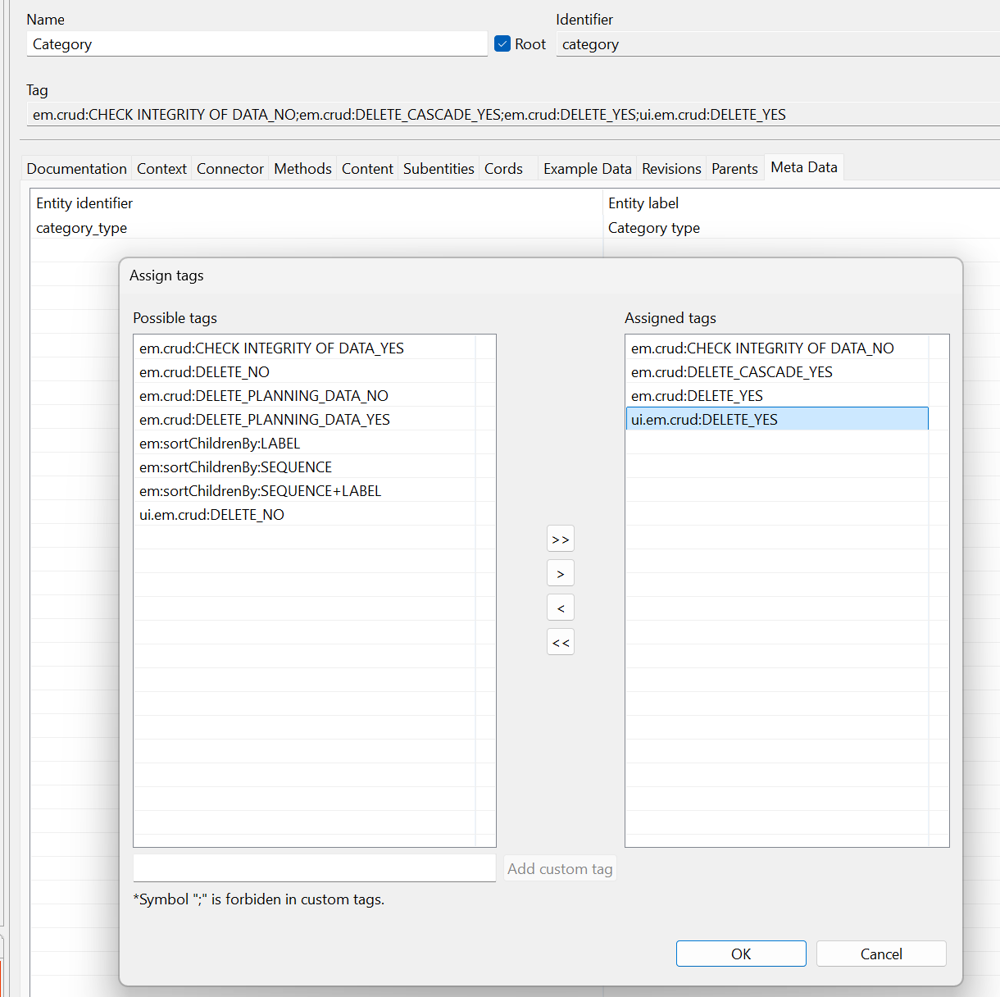
See: How to customise your Entity Model with Tags
Because re-import deletes all existing bucket and content before importing, all bucket and content entities (key value, media asset, etc.) must be assigned the DELETE tag. Without it, import results may be unexpected.
MuaDB
If your entity model is using MuaDB check if your configuration exists and that all entities in your entity model already directly reference this.
MuaConnector

<?xml version="1.0" encoding="UTF-8"?><con:PluginConfig xmlns:con="com.priint.pubserver.config.manager/20130620">
    <con:name>aio.xml</con:name>
    <con:type>ContentConnector</con:type>
    <con:custom/>
    <con:dependencies/>
    <con:instances>
         <con:entry key="aiomua">
            <con:PluginConfig>
                <con:custom>
                    <mua-connector version="1.0">
                        <compressionThreshold>4096</compressionThreshold>
                        <serializationFormat>x</serializationFormat>
                        <jdbcResource>jdbc/MuaConnector</jdbcResource>
                        <cacheDuration>0</cacheDuration>
                        <returnAllForEmptyContext>true</returnAllForEmptyContext>
                    </mua-connector>
                </con:custom>
                <con:dependencies/>
                <con:instances/>
            </con:PluginConfig>
        </con:entry>
    </con:instances>
</con:PluginConfig>
EntityModel
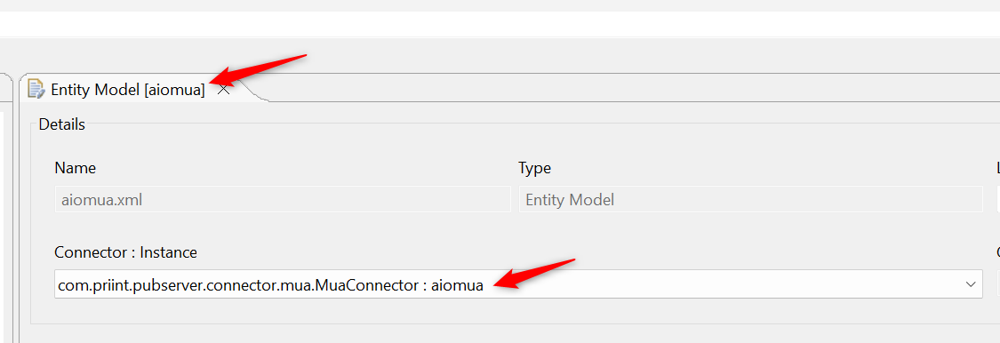
Ensure that your entity-model uses MUA Connector to enable fast data imports using the Bulk-Upsert Endpoint.
Configure Authentication for Bulk Upsert Job
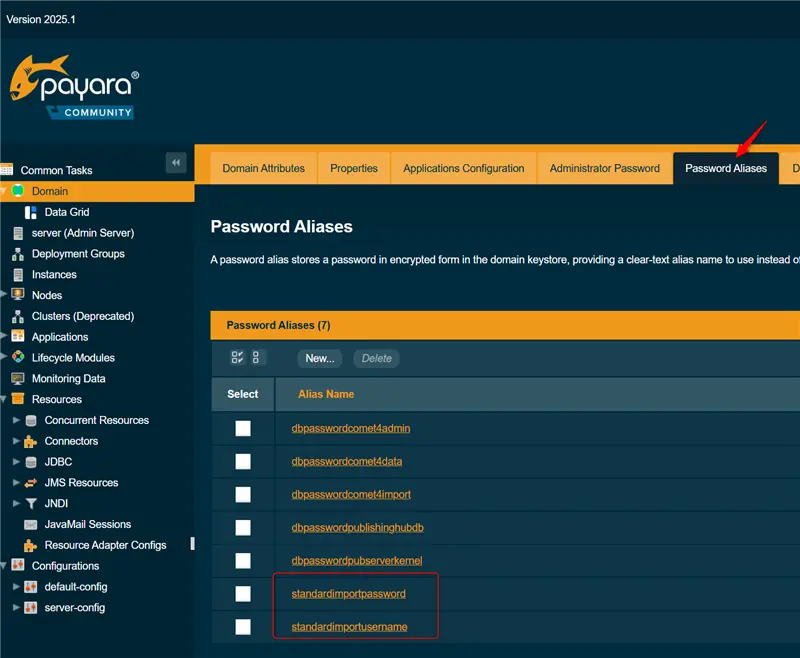
The Bulk Upsert needs to be started using the priint:suite EntityManagerService. The import processes authenticate against Publishing Server using these credentials. Store these as Password Aliases in the Payara Admin Console.
Go to Payara Admin Console > Domain > Password Aliases and create four aliases: Reference each secret alias in properties using the ${ALIAS=alias-name} syntax.
standardImportUserNamestandardImportPassword
Next Steps
For the ISON XML mapping configuration, see XML Configuration.